@Home Modeling
Imagine that you’re taking a movie-making course. On the first day, you learn that movie-making requires writing a script, auditioning actors, framing your shots, editing, audio remixing, special effects, post-production, and distribution. After received all of this information on the first day of class, you will reinforce this knowledge and build these skills all semester by … studying the plot and characters of Star Wars.
OK, that’s pretty silly. You’re obviously not going to be able to make a film or appreciate film making after this kind of course. Let’s add a three-hour practical experience each week where you’ll recreate, frame-for-frame, a scene from Star Wars and be graded based on how well you’ve recreated that scene. Is that better?
We would recognize this as a terrible way of teaching movie making and appreciation, but that is the structure of our science classes. It should not surprise us that students emerge from our science courses without an appreciation for science because they don’t actually engage in it during their formative education. The observation-assumption approach is an attempt to rectify this by identifying the basal components of science (observations, assumptions, and models) and engaging with skills associated with the creation and evaluation of all three components. Currently, lab activities focus extensively on observation and observational skills. If there are any assumption-making and model-building skills in a lab, it’s in the form of a mish-mash often labeled as “analysis”.
This focus on observational skills (with “analysis” skills hopefully picked up along the way) has consequences downstream in the science career pipeline. The easiest way to spot a novice scientist, for example, is to see how much of their presentation or report is a description of what happened in the lab versus a discussion of why it mattered. In observing my upper-level students’ presentations on their summer research this past fall, and looking back at some of my own early graduate school presentations, they tend to be 95% descriptive. Instruments used will be described in detail, methodologies will be described in detail, data acquired will be described in excruciating detail. As for what it all means? That’s a conclusion slide or paragraph with musings on what data to collect next. You’ll be lucky to find any kind of analysis at all.
But we shouldn’t be surprised by this. These are skills that aren’t taught. Most of the time, you’re expected to just pick them up at some point before a Masters or PhD is granted.

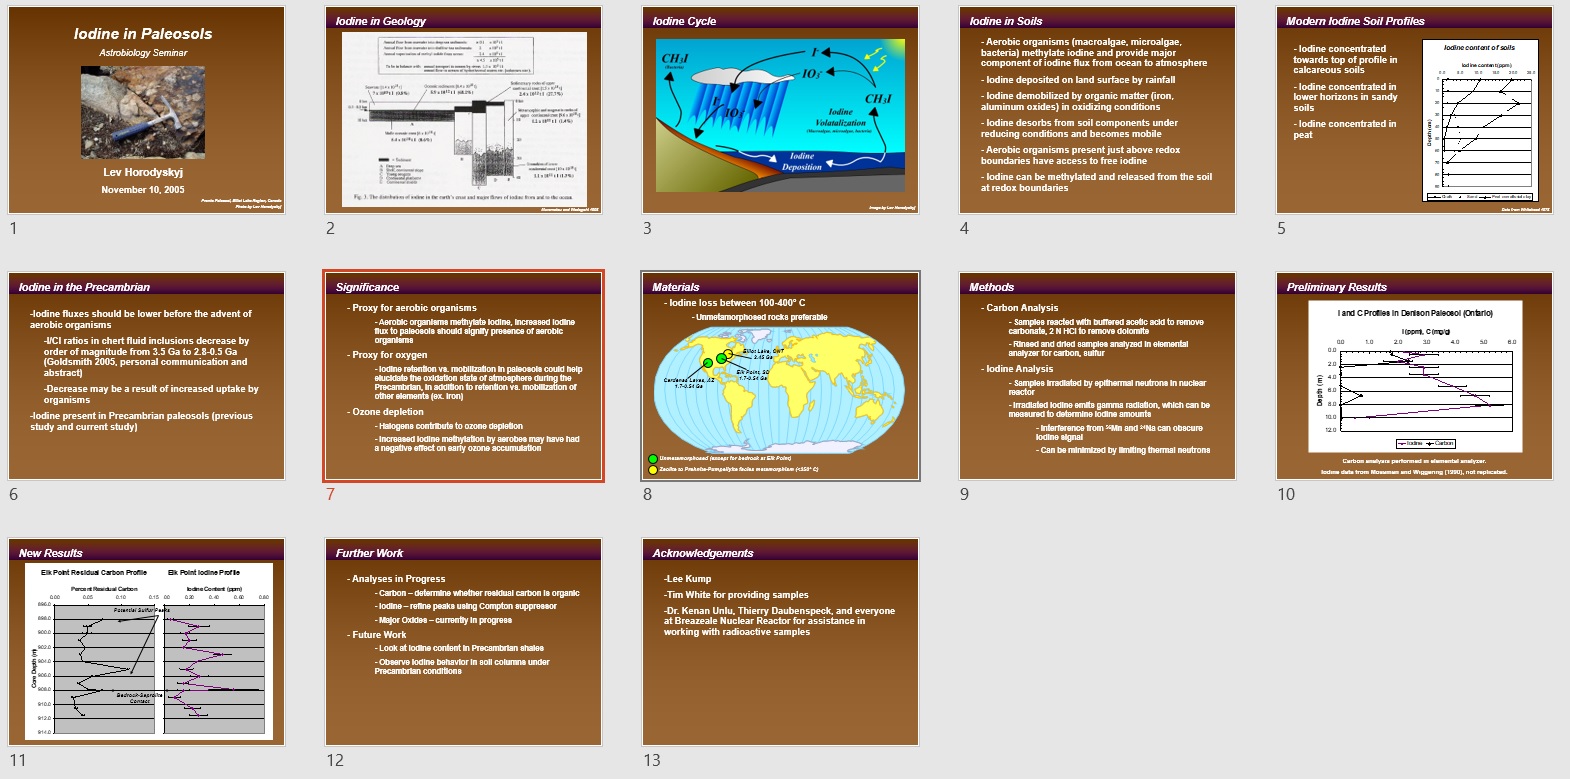
A 2005 presentation, from the third year of my PhD. The slideshow is a mostly background, a couple of slides on hypothesis and significance, then methods and results, skipping immediately to future work without any kind of analysis. This is typical for novice scientists. Because students spend most of their time in the lab, they develop excellent descriptive skills to explain what they did, but analysis skills can languish because they are rarely explicitly taught.
In the observation-assumption approach to science, I propose that all scientific models are constructs of observations and assumptions, and that explicit and identifiable skills can be trained for observations, assumptions, and models. Typical lab activities focus almost exclusively on observation skills. The goal I set for myself in the second semester of teaching physics at the University of the Virgin Islands was to see if I can develop labs that better teach assumption and modeling skills. Since we were moving away from kinematics and easy home-hack labs and field observations, I thought it was fitting to move towards computational modeling of physics phenomena. With intro-level biology students.
The planned structure for the labs was as follows:
- Week 1 – Set up a home-hack set-up of a physical phenomenon and take careful and detailed measurements of phenomenon
- Week 2 – Build a computer model that replicates what you observed in the physical set-up the week before (identify the right equations, program them, and then tweak your assumptions until they generate results that match observations from the previous week)
- Week 3 – Use the model to predict observations in a new set-up, then create the new set-up and see if it generates the observations your model predicted
For the spring semester, I chose waves as the lab motif, as they were the underlying concept for pretty much the entire second semester of introductory physics. My idea was originally to start with water waves in a container, followed by light waves in a double-slit experiment, and then end with the quantum model of the hydrogen atom. Essentially, what I wanted to show my students was that we can reuse the same model (more or less) to explain multiple phenomena. I also wanted an excuse to learn Python.

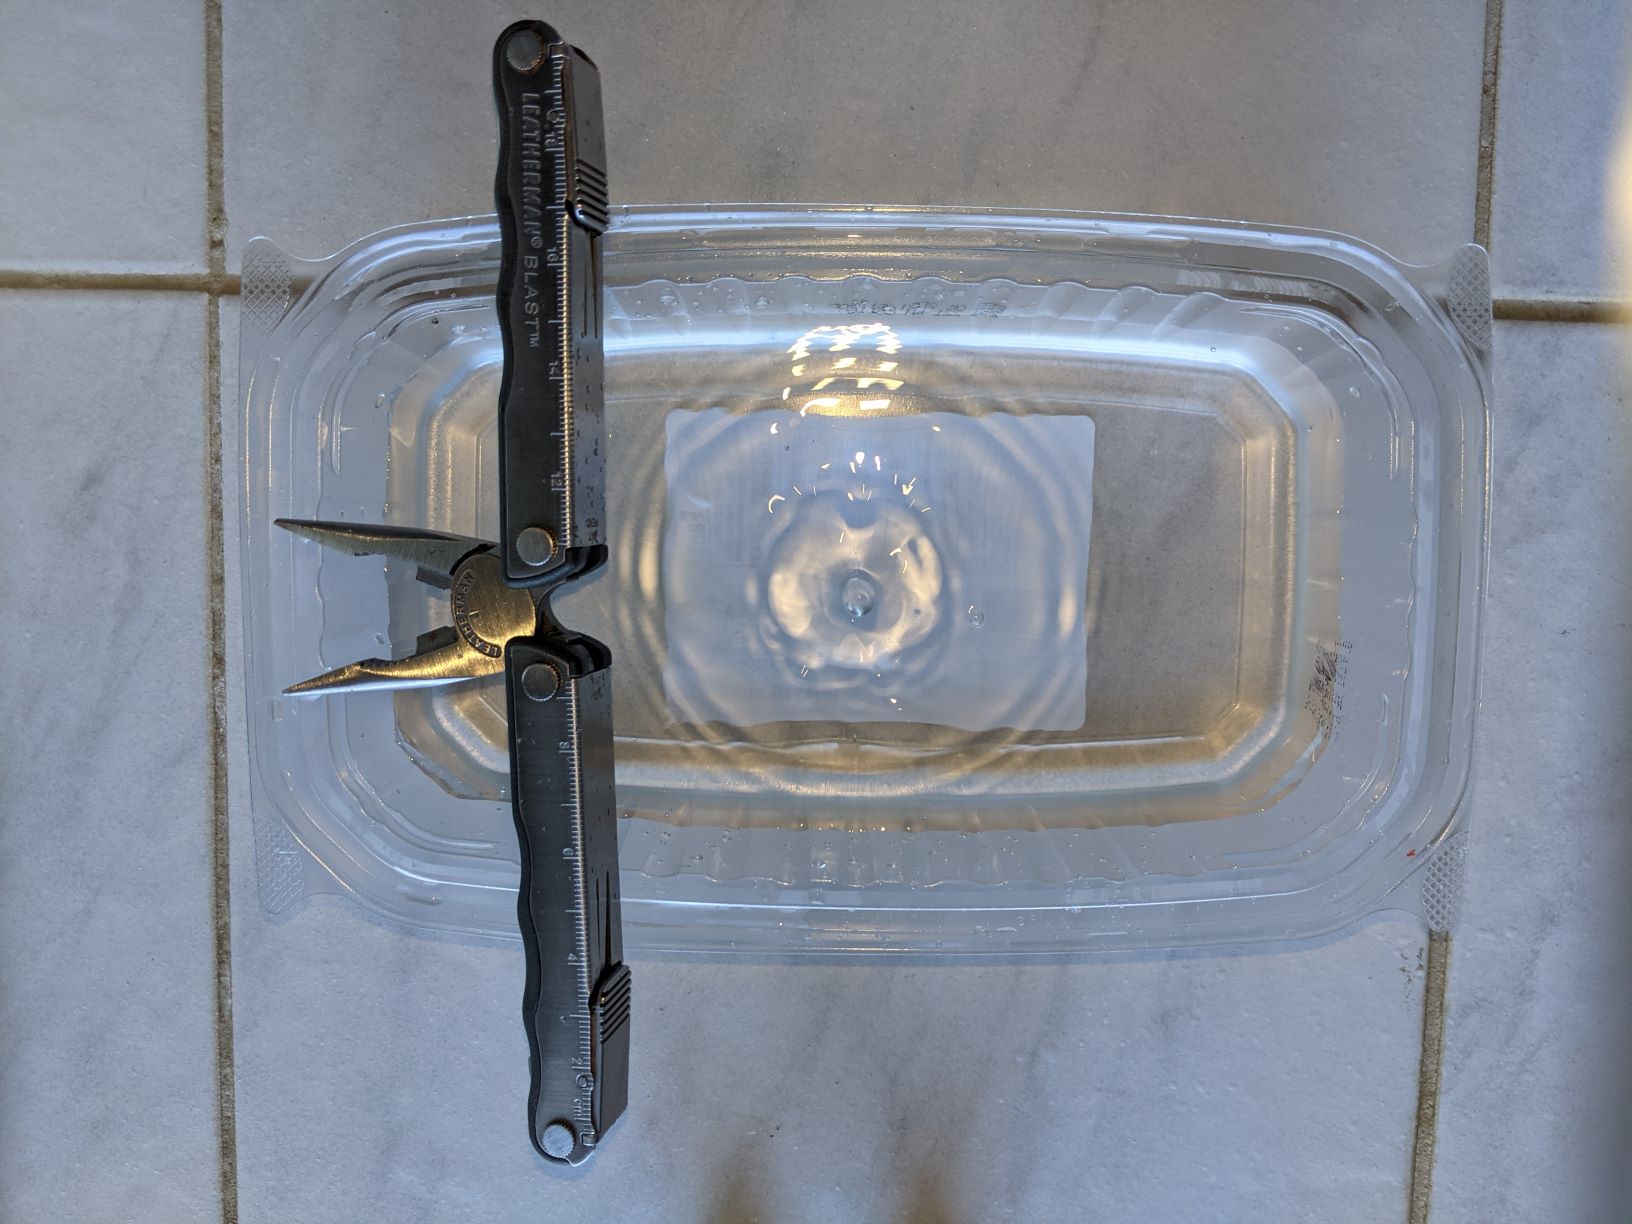
Week 1 of the waves lab required precise measurements of the waves formed by dripping water. With slow dripping, you can get clean waves that are easy to measure. Most students poked holes that were too big, resulting in faster dripping and considerably messier wave structures. The camera flash helped illuminate the waves better for measuring.
For this sequence, we utilized replit.com, which creates a standardized space that behaves the same for all students. This immediately negated the biggest problem in doing any kind of programming with novices … setting up your computer for programming. In the replit ecosystem, we just borrowed someone else’s computer and selected Python as our language of choice. Within five minutes everyone in class was set up and ready to go.
Unfortunately, everything beyond that was more difficult. My one-week crash-course in programming quickly bloated into almost five weeks of introduction and practice. The impact on the class was considerable. About a third of the class became more engaged and were thrilled to be learning a new skill, even surprised that they could use programming to do science. Another third of the class wasn’t fully on board, but were able to laboriously follow the examples and with enough practice became comfortable enough with programming to utilize it. The last third of the class almost completely disengaged, either copy+pasting whatever they could find from anywhere else or declining to try at all. The impact was so disparate that I had to ditch my three-act lab structure almost immediately. Too many students wouldn’t be able to identify the appropriate equation to use, much less convert it into Python code.
To cope, I instead built the models for students (keeping them as simple as possible and not using any coding I hadn’t shown them explicitly in class), filled with comments to explain what each bit of code did and why. Then I directed them to the correct lines to manipulate and what to watch for as they manipulated those lines. This helped alleviate some of the anxiety that coding caused students early on and helped make it a bit more fun again, especially when the code generated 3-D water drop ripple models that they could watch change as they manipulated the assumptions in the model. But this approach had short-comings as well. It was highly dependent on good, detailed measurements from the week before. The students who were least comfortable with coding also tended not to have good experimental setups the week prior or make good or detailed measurements either, and so didn’t have much to work with for the digital portion of the lab.

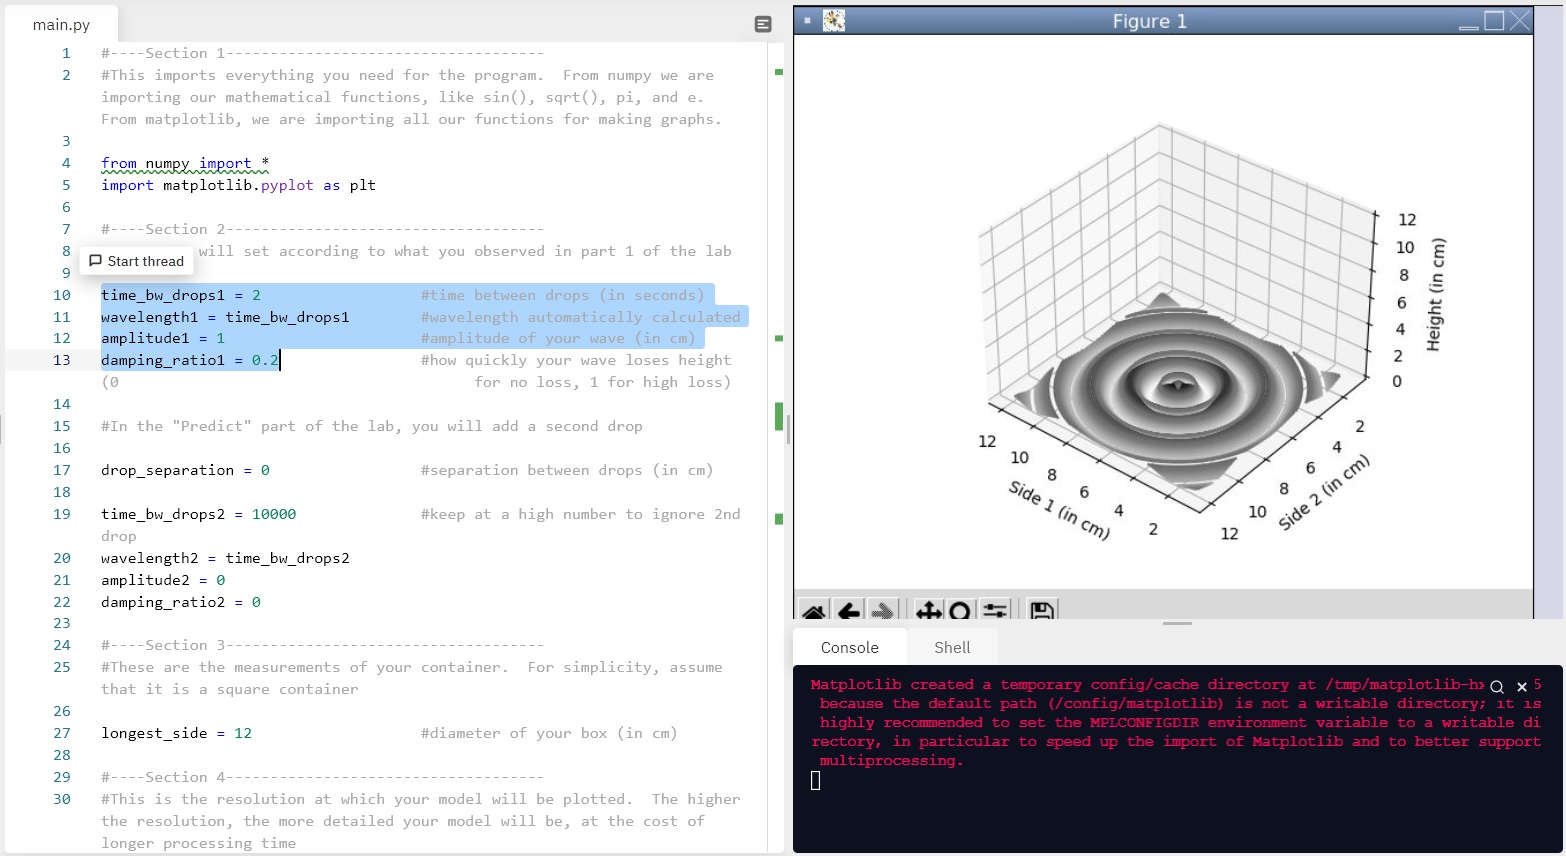
Students worked with prebuilt code, which allowed them to create one or two water droplets and observe ripple and interference patterns. In week 2, students manipulated the highlighted lines until the visual rendering matched what they had photographed in week 1. The highlighted lines were to be updated to reflect what students had measured the previous week, and what wasn’t observed was assumed and changed until the digital visual reflected what they had observed. During this lab, students were expected to explain every number they attempted and why so that I could trace their chain of logic as they converged on a solution they were happy with. (click here for source code)
Overall, this approach was perhaps too ambitious for an introductory level non-physics majors physics course. Still, some interesting patterns did emerge. I designed this sequence to have students begin working with models and their underlying assumptions. How students identified, considered, and manipulated assumptions was perhaps the most interesting outcome from this approach. All models have assumptions that need to be made in order for the model to work. In the water drop model, to keep the mathematics simple and the code accessible to novices, my model did not have boundaries, allowing the waves to ripple out to infinity. It also assumed a square container and perfect waves. Yet when asked to identify the underlying assumptions in the model, students were not able to identify any of these. The only assumptions they repeatedly pointed out were the explicit ones they altered (wave amplitude because it was difficult to measure and damping ratio). The implicit assumptions were opaque to them, even when they were explained in the comment lines. This is similar to the problem I saw in how students solved physics scenarios in traditional problem sets … they tend to overlook implicit information, even when told to look for and identify it.
Worse, students often weren’t able to see the assumptions in their models because they were incapable of seeing that the model had failed. Even when the digital output clearly did not match the photos they had submitted, students would often claim a perfect match. The idea that the model may have shortcomings, be incomplete, or simply be wrong was not possible. Despite being explicitly told on the first day of class that the most important question to ask in class is “what if I’m wrong?“, most students kept asking themselves “how do I prove I’m right?” It was a distressing outcome for a curriculum designed to train students in asking themselves the first question. Yet, it led to one of the most interesting outcomes I’ve ever seen in a class activity and a potential pathway to designing modeling labs that actually work …
Notes for Practice
@Home Modeling
Use a standardized integrated development environment (IDE). Student computers can often be old, weird brands, or borrowed with no ability to install programs. Using an IDE like replit.com helps students get up and running almost immediately.
Scaffold coding concepts. Variables, arrays, if-else statements, and loops are a lot for students to handle (especially the non-linear components). Introduce simple coding early in a lab sequence and design modeling activities that allow you to address both the science concept of the week and introduce only one new coding functionality alongside it to prevent overload.
Pick a theme. Choose a semester-long theme and have every lab build upon that theme. This will allow students to complexify simple starting code (without having to start from scratch each time because the topic has changed) and see how models can be iterated upon to explain more and more complex phenomena.
Provide students with options. Students see coding like a math problem … that there is only one correct way to complete it. Create activities and challenges that help students see the multiple coding pathways to the same outcome.
Dissect a model. If you provide students with a simple model to use in lab instead of having them code one up themselves, have them explain to you how it works, including the implicit and explicit assumptions it relies on. If they don’t understand what a certain line of code does, tell them to alter it and see what happens (which is an important component of scientific thinking).
Teach the error codes. Error codes can be near-impenetrable to students (and often instructors). Have students practice interpreting them and identifying the source of the error. Python is pretty beginner-friendly, but even so, it often throws errors that are difficult to interpret.
